INSTALLATION

Working Together
Installing mosaics requires cooperation and teamwork. In this photo, the fathers of the church school community are installing the center panel of the Jesus and the Fishermen mosaic onto the upper section of the wall of their school lobby. The teams leader, also one of the parents, is a skilled carpenter. He also installed a beautiful cherry frame as a border.
Installing mosaics requires cooperation and teamwork. In this photo, the fathers of the church school community are installing the center panel of the Jesus and the Fishermen mosaic onto the upper section of the wall of their school lobby. The teams leader, also one of the parents, is a skilled carpenter. He also installed a beautiful cherry frame as a border.
Andy and Sally at
St. Joseph's School
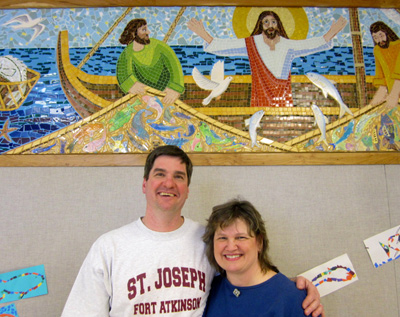
Andy and Sally are a husband and wife team who invited me to St. Josephs School in western Wisconsin. Sally, the art teacher in charge of the school art enrichment program, found me online. Andy, the school facilities manager, helped us trouble shoot all the details of the installation, and manage the team of dads who did the work right after Sunday mass.
St. Joseph's School
Andy and Sally are a husband and wife team who invited me to St. Josephs School in western Wisconsin. Sally, the art teacher in charge of the school art enrichment program, found me online. Andy, the school facilities manager, helped us trouble shoot all the details of the installation, and manage the team of dads who did the work right after Sunday mass.
The Dedication Ceremony
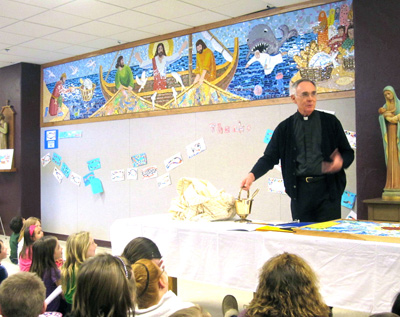
It is customary to follow the completion of the project with a dedication ceremony. At St. Joseph School, the priest publicly blessed the mosaic on a Sunday morning, sharing this happy event with students, parents, and teachers from the school community.
It is customary to follow the completion of the project with a dedication ceremony. At St. Joseph School, the priest publicly blessed the mosaic on a Sunday morning, sharing this happy event with students, parents, and teachers from the school community.
Viewing the Mosaic
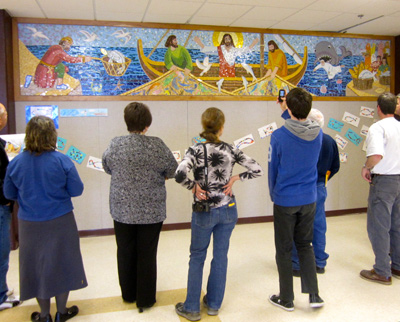
That first moment after the mosaic is installed is exciting. All the planning, conversation, and long hours of work are finally complete. Everyone stands back and takes a long look, reflecting on the process of making the mosaic and enjoying the beauty of the finished art. The mosaic is designed to complement the architecture and built to last so people will enjoy viewing the mosaic for many years to come.
That first moment after the mosaic is installed is exciting. All the planning, conversation, and long hours of work are finally complete. Everyone stands back and takes a long look, reflecting on the process of making the mosaic and enjoying the beauty of the finished art. The mosaic is designed to complement the architecture and built to last so people will enjoy viewing the mosaic for many years to come.
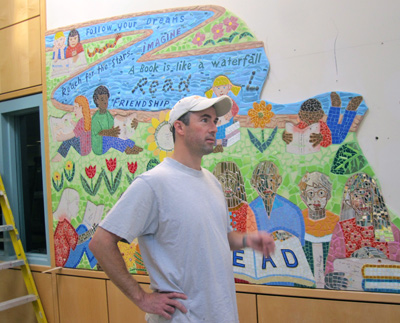
Mosaic Panels
Mosaics are often made on panels. For outside walls, the panel material is cement board that is coated with a waterproofing membrane on the back and sides. For inside walls, 3/4" MDO signboard is a good choice for the panel material, since it is rigid and strong. This photo shows one of the school fathers talking about the installation. In the background several panels are already mounted on the wall.
Mosaics are often made on panels. For outside walls, the panel material is cement board that is coated with a waterproofing membrane on the back and sides. For inside walls, 3/4" MDO signboard is a good choice for the panel material, since it is rigid and strong. This photo shows one of the school fathers talking about the installation. In the background several panels are already mounted on the wall.
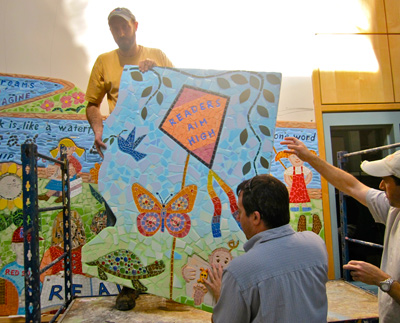
Assembling the Panels
The mosaic panels are like jig saw pieces. They are designed to follow the seams of the composition, so that during the making of the design, elements are created without breaks in the art. The panels are sized so that they are not overly cumbersome or heavy. After the panels are installed, the seams are grouted with matching colors so that they no longer are visible.
The mosaic panels are like jig saw pieces. They are designed to follow the seams of the composition, so that during the making of the design, elements are created without breaks in the art. The panels are sized so that they are not overly cumbersome or heavy. After the panels are installed, the seams are grouted with matching colors so that they no longer are visible.
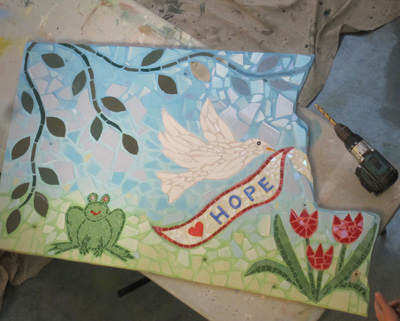
A Piece of the Puzzle
This is one of twelve panels of "The Reading Garden" at Chickering School. It measures about 2 by 3 feet, and weighs about 40 pounds. I made the panels from MDO signboard in my studio, then brought them to the art room at school where the community did all of the mosaic work and the grouting work. This piece is complete and ready to be installed onto the wall.
This is one of twelve panels of "The Reading Garden" at Chickering School. It measures about 2 by 3 feet, and weighs about 40 pounds. I made the panels from MDO signboard in my studio, then brought them to the art room at school where the community did all of the mosaic work and the grouting work. This piece is complete and ready to be installed onto the wall.
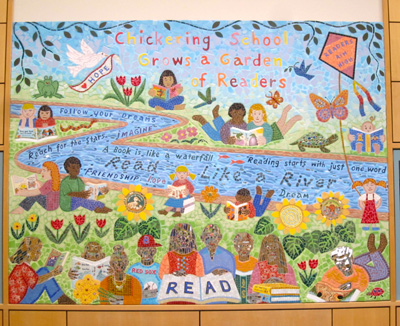
The Finished Mosaic
All 12 pieces have been installed and grouted. The result is a complete, seamless mosaic mural that spans from one side of the existing lobby molding to the next. The wall behind is gypsum board on metal studs. We used toggle bolts that are countersunk into the panels. The head of each toggle is marked with a milliflori glass bead, so that if it is ever necessary to relocate the mosaic, all of the hardware can be easily found.
All 12 pieces have been installed and grouted. The result is a complete, seamless mosaic mural that spans from one side of the existing lobby molding to the next. The wall behind is gypsum board on metal studs. We used toggle bolts that are countersunk into the panels. The head of each toggle is marked with a milliflori glass bead, so that if it is ever necessary to relocate the mosaic, all of the hardware can be easily found.